このCookBookでは、imuiListTableでセルに配置したアイコンから別画面に遷移する方法について紹介しています。

imuiListTableについての詳細はAPIドキュメントを参照してください。
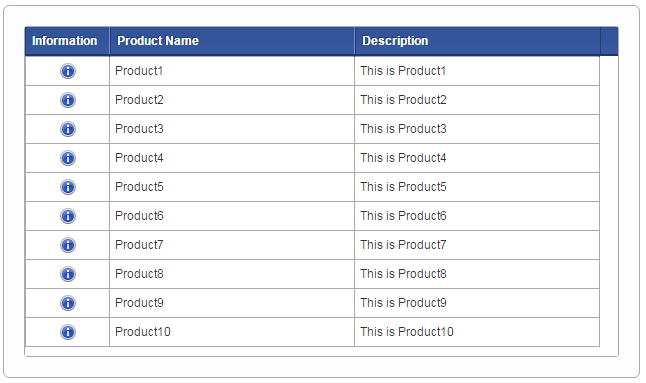
完成イメージ
1. 「Information」アイコンをクリックしてください。
2. 別画面が表示されます。
完成サンプル
以下の完成サンプルをダウンロードしてご活用ください。
e builder プロジェクト : im_cookbook_113323_listtable_icon.zip
imm ファイル : im_cookbook_113323_listtable_icon.imm
ローカル環境で表示させる場合は、以下のURLにアクセスしてください。
http://localhost:8080/imart/im_cookbook/113323/list
なおベースURLである以下の部分は、環境に合わせて適宜変更してください。
http://localhost:8080/imart
レシピ
- アイコンを入れる行を含めた imuiListTable タグを作成してください。
- データ取得用のファイルを用意してください。
- 別の画面に遷移するfunctionを作成してください。
1. アイコンを入れる行を含めたimuiListTableタグを作成してください。
以下のように プレゼンテーションページにimuiListTableタグを定義してください。
今回はinformationカラムに別ページへ遷移する情報アイコンを表示します。
informationカラムにはcallFunctionタグを含めてください。
callFunctionタグにはカラムのセルクリック時に実行する関数を定義することができます。
callFunctionタグのname属性に実行する関数名を指定してください。
src/main/jssp/src/im_cookbook_113323/views/list.html
|
1 2 3 4 5 6 7 8 9 10 |
<imart type="imuiListTable" id="list" process="jssp" target="im_cookbook_113323/ajax/getList" width="100%" height="300" autoEncode="true"> <cols> <col name="productId" key="true" hidden="true"/> <col name="information" caption="Information " sortable="false" width="20" align="center"> <callFunction name="informationFormSubmit" /> </col> <col name="productName" caption="Product Name" /> <col name="productDescription" caption="Description" /> </cols> </imart> |
2. データ取得用のファイルを用意してください。
以下のように、サーバサイドでリストテーブルに表示するデータを取得するファイルを作成してください。
返却するリストのinformationには 情報アイコンを表すhtmlの'<div class="im-smart-icon-common-16-information" />'を指定しています。
src/main/jssp/src/im_cookbook_113323/ajax/getList.js
|
1 2 3 4 5 6 7 8 9 10 11 12 13 14 15 16 17 18 19 20 21 22 23 24 25 26 27 28 29 30 31 32 33 34 35 36 |
function getList(request) { var arr = [ {'productId':'1', 'information':'<div class="im-smart-icon-common-16-information" />', 'productName':'Product1', 'productDescription':'This is Product1'}, {'productId':'2', 'information':'<div class="im-smart-icon-common-16-information" />', 'productName':'Product2', 'productDescription':'This is Product2'}, {'productId':'3', 'information':'<div class="im-smart-icon-common-16-information" />', 'productName':'Product3', 'productDescription':'This is Product3'}, {'productId':'4', 'information':'<div class="im-smart-icon-common-16-information" />', 'productName':'Product4', 'productDescription':'This is Product4'}, {'productId':'5', 'information':'<div class="im-smart-icon-common-16-information" />', 'productName':'Product5', 'productDescription':'This is Product5'}, {'productId':'6', 'information':'<div class="im-smart-icon-common-16-information" />', 'productName':'Product6', 'productDescription':'This is Product6'}, {'productId':'7', 'information':'<div class="im-smart-icon-common-16-information" />', 'productName':'Product7', 'productDescription':'This is Product7'}, {'productId':'8', 'information':'<div class="im-smart-icon-common-16-information" />', 'productName':'Product8', 'productDescription':'This is Product8'}, {'productId':'9', 'information':'<div class="im-smart-icon-common-16-information" />', 'productName':'Product9', 'productDescription':'This is Product9'}, {'productId':'10', 'information':'<div class="im-smart-icon-common-16-information" />', 'productName':'Product10', 'productDescription':'This is Product10'}, ]; var page = request == undefined ? 1 : request.page; var rows = request == undefined ? 10 : request.rowNum; var sord = request == undefined ? 'asc' : request.sortOrder; var sidx = request == undefined ? 'productName' : request.sortIndex; arr.sort(function(a,b) { if (a[sidx] < b[sidx]) { return sord == 'asc' ? -1 : +1; } if (a[sidx] > b[sidx]) { return sord == 'asc' ? +1 : -1; } return 0; }); var result = { page: page, total: arr.length, data: arr }; return result; } |
3. 別の画面に遷移するfunctionを作成してください。
「1. アイコンを入れる行を含めた imuiListTable タグを作成してください。」のcallFunctionに定義したfunctionを作成してください。
callFunctionによって呼ばれたfunctionはrowId(行のキー)を受け取る事ができます。
rowIdはcolタグのkey属性にtrueを指定したものです。
今回は'productId'をキーに指定しています。
また、rowIdをフォームのパラメータに含めています。
|
1 2 3 4 |
function informationFormSubmit(rowId) { $('#product-id').val(rowId); $('#information-form').submit(); } |
subimitするformは以下のように定義してください。
|
1 2 3 |
<form id="information-form" action="im_cookbook/113323/info" method="post"> <input type="hidden" id="product-id" name="productId" value=""/> </form> |
遷移先である imart/im_cookbook/113323/info では、受け取ったプロダクトIDを表示しています。

これでimuiListTable表示時に別画面へ遷移するアイコンをセルに表示することができました。


